- Upgrade
- Posted
Nottingham upgrade achieves dramatic energy savings
Tina Holt had experience advising homeowners on energy efficiency, so when she wanted a low energy home, buying a run-down 1950s dwelling and aiming to turn it passive was an obvious step. She tells her own story below.
Through my own work helping people to save energy and carbon using behavioural change and energy-efficiency measures — running talks, workshops and seminars, and carrying out home energy surveys — I had become curious about ultra-low energy refurbishment. Fortunately, my partner Richard was just as enthusiastic about taking on a project as I was.
In 2008, with a baby and a second one on the way, we decided that a back garden and a warmer house would be a good idea. Around here, most homes have solid walls, and the few with cavity wall insulation are still not that great for comfort, carbon emissions or energy bills. In the end, we decided to look for a project, in order to undertake a better-than-building-regs energy efficiency upgrade.
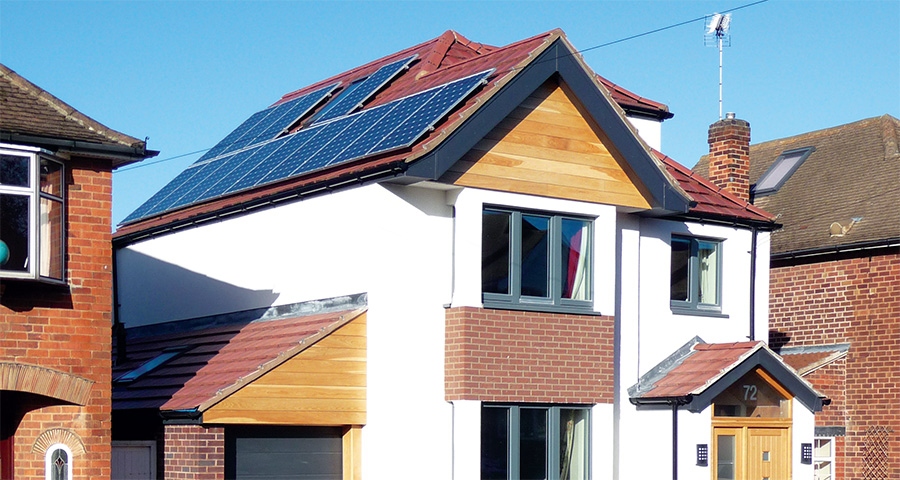
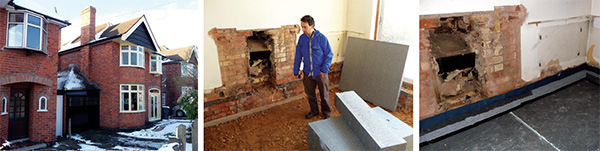
Our chance came in October 2009, and within three months we were the proud owners of a solid wall house built in 1952. With the original bathroom, kitchen, single-glazed windows and fireplaces, it was like stepping back in time— and it required a major overhaul both inside and out.
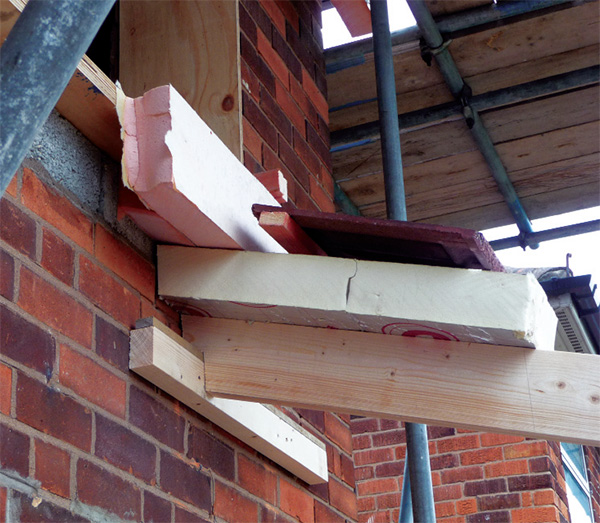
The original house was built in 1952 and required a major overhaul both inside and out; the ground floor features 300mm platinum EPS insulation under a 100mm concrete slab.
The plan was to wait at least a year before doing anything, but we quickly realised that we were going to be uncomfortable. Apart from the cold, there was a serious issue with condensation and resulting mould. About a month after moving in, the gas boiler went out of action for two utterly miserable weeks. At this point I was weighing up how much insulation we would need, and the experience ultimately led us to aim for the Enerphit standard.
Our friend and eco architect, Gil Schalom, helped pull together our ideas for an extension, loft conversion, open plan kitchen area and a major thermal upgrade. Then he suggested that we get in touch with Alan Budden of Eco Design Consultants for PHPP modelling. Together we wrestled with the permutations that might get us to Enerphit on a site where our detached house is sandwiched tightly between adjacent houses to the north and south.
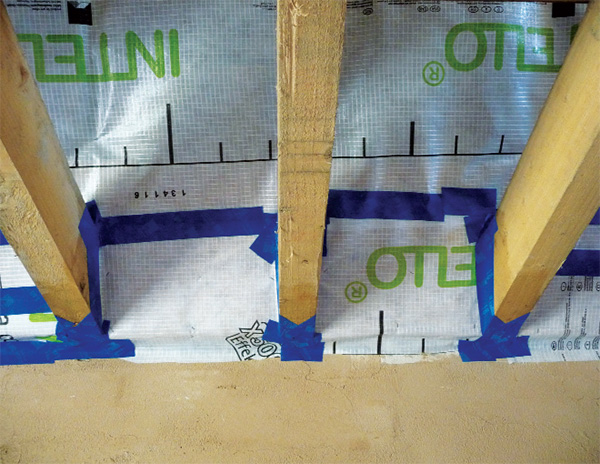
The Pro Clima system takes care of airtightness in the roof build-up, which was a challenge because of the complex roof structure
The passageway on one side and the garage on the other were so narrow that we had to choose between aiming for Enerphit with phenolic foam insulation or abandoning Enerphit altogether and using EPS or something more natural (we ultimately went with phenolic). Deciding to remove the chimneys, maximise airtightness and go for MVHR was something we had to get our heads round early on, but we feel it was the right decision.
We battled the planners, who would have preferred bricks or brick slips on the whole front elevation (they ultimately agreed to have them only on the bay window). The garage was falling down due to drainage issues, the roof was visibly sagging over the cantilevered round bay and all the utilities needed moving for one reason or another. In the end we decided to rebuild the garage out of structural necessity and deal with anything else that would become an issue in due course. Our motto was ‘if in doubt, sort it out’ – and there was plenty to sort out.
In October 2011, our ailing gas boiler finally died, we moved to a rented house up the road, and work finally started. The rented house saved my sanity and provided a useful storage facility. We stored all sorts — the floorboards from the original ground floor (they later became the new attic floor), Lindab ducting, and we had a lounge full of EcoPassiv windows and doors.
Our builder had no prior experience of passive house new build or retrofit, but Richard had used the same company for a previous house extension and was confident of a quality job. Unusually perhaps, we did the project on a time and materials basis because neither we nor our builder had attempted anything like this before, and this removed the temptation to cut corners. We bought key items like the windows ourselves, and by being closely involved we were well-placed to spot any issues if they arose.
Together, Richard and I oversaw the project, liaising closely with the builder. My prior building experience extended to painting a wall and putting up a few shelves, so I was glad to leave Richard in charge of the mainstream building work, plumbing and electrics. My remit was to oversee insulation, airtightness and cold-bridge detailing.
Frequent site visits were key to ensuring continuity of insulation. Leaving the children with relatives or friends, I would pop up like a bad penny at any time of day to seek out gaps. Everything from down-stands, up-stands and insulation beneath ground level to the external wall insulation (EWI) and roof insulation was checked thoroughly before it disappeared under the next layer of the construction. Thankfully the builders really seemed to get it.
Having our architect just five minutes down the road was extremely useful, both for briefing the team at the start of each step, and for dropping round if I spotted an issue. At every stage, a few minutes discussion with the relevant people helped to ensure that everything was buildable and that each person knew how their bit fitted in with the rest.
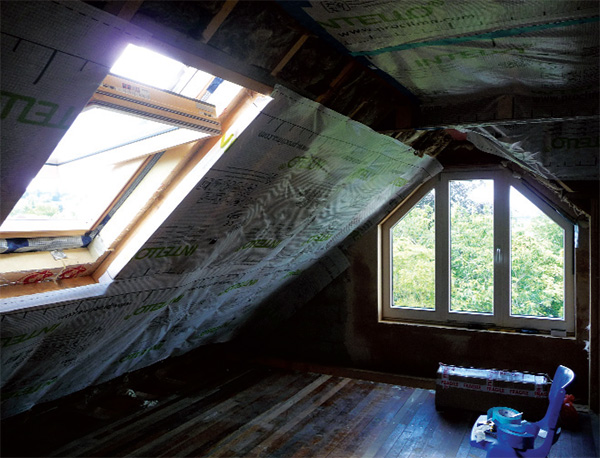
We knew that airtightness would be our biggest challenge because of the complex roof structure. The air barrier is internal: plaster on the masonry walls and Intello membrane for timber structures such as the roof and the new front bay. However, we doubled up by taping the roofing membrane (Solitex Plus) on the outside of the insulation as a wind barrier. With hindsight, it would have been worth parging the external walls before adding EWI as this would almost certainly be more effective than just using a near-continuous covering of adhesive on the insulation boards.
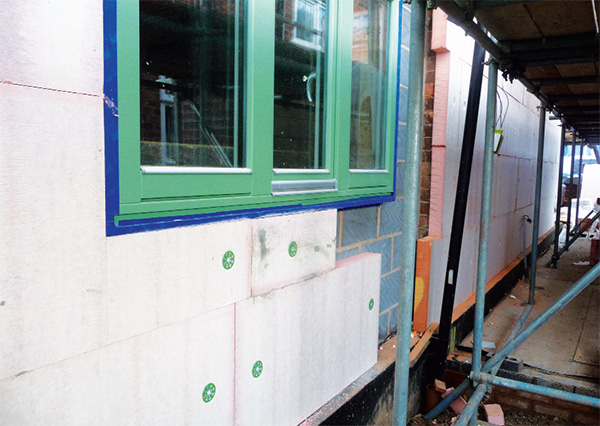
The house's external walls are insulated with a Permarock system including 180mm of phenolic foam insulation. Windows sit proud of the blockwork to ensure a continuous insulation layer.
To minimise costs, Richard and I did most of the airtightness taping ourselves. We were very impressed with the Pro Clima products and quite enjoyed the work — although the novelty had rather worn off by the time we’d finished the joists going into the eaves.
There were a few worrying moments — like having a house with no roof. As if that were not enough, we ran open home tours at each stage of the refurbishment to share knowledge with interested householders and professionals. To my great relief, in spring 2012 the new roof was on and the external wall insulation below the damp proof course could begin.
During the summer the external insulation was completed, the ventilation ducts went in, the garage was re-built and internal airtightness work began. To make the most of the thermal mass provided by the brickwork, we used a dense render on the internal walls and a thin skim of gypsum plaster. (It was like walking into a rainforest just after the plastering was done – but we cleaned the house up, switched on the MVHR and humidity dropped to normal levels.) In October 2012, exactly a year after moving out, we moved back in to our lovely warm shell. While the airtightness test result of 1.08 air changes per hour fell just short of Enerphit, we were not too concerned – the back door hinges needed adjustment and air was leaking spectacularly along the full height of the door. It took almost a year before we got around to having it adjusted correctly, by which time Richard had made a load more holes which we have yet to rectify. So currently airtightness sits between 1 and 2 ACH. This raises the issue of DIY in passive houses and whether the decision to rely on an internal air barrier was the right one. But that’s a topic for another day.
Construction aside, how does the house perform and was it all worth it? We are extremely pleased with the level of thermal comfort and are total converts to the improved air quality provided by mechanical ventilation with heat recovery. One of my favourite features is the drying cupboard in the bathroom. Being able to dry clothes quickly indoors is life-changing, as is the absence of condensation and mould on the windows and walls.
Before the refurbishment, humidity levels were commonly at 60 to 70% and occasionally as high as 90%. Now they generally stay between 45% and 55%, even in the bathroom-cum-drying room.
The temperature records (from dataloggers) back up what we can already feel: that we are benefitting from improved comfort — not just with higher average temperatures, but much more stable temperatures. The internal temperature used to yo-yo as the heating system tried to keep pace with heat loss. Now it’s really easy to keep the house as we like it (around 20-21C in the day and 19-20C in the bedrooms at night).
Energy use for 2013 shows an actual space heating demand of 27 kWh/m2/yr, compared with 24 kWh/m2/yr as modelled — both values based on the PHPP floor area of 125sqm. Of course, in the first quarter of 2013, our three little radiators were still heating up the brickwork and drying out the plaster in what was a colder than average winter.
I’ve heard various anecdotes about health improvements resulting from passive house air quality so it came as no surprise that we are all benefitting from better respiratory health. But there has been one completely unexpected benefit for me: after an accident 25 years ago, several months of joint pain is the norm every winter. And since moving back into our refurbished house, I’ve had none at all.
Now that we live in a low energy home, can we abandon the energy saving behaviours that we previously used to keep our bills from spiralling out of control? We think not. Although we have certainly taken significant benefit in comfort, we have retained many of our original energy saving habits and learned some new ones, particularly around heating and ventilation control. I suspect that to achieve its full energy-saving potential, every low energy home still needs energy-savvy occupants.
A wall to pitched roof insulation detail
Selected project details
Clients: Tina Holt and Richard Middup Architect: GSD Architecture Passive house consultant: Eco Design Consultants EPC Assessor: Andy Beckford Main contractors: McCane Construction External insulation: Permarock Mineral wool: Knauf Windows & doors, MVHR & sanitaryware: Green Building Store Roof windows: Fakro Airtightness membranes, tapes and grommets: Green Building Store Airtightness testing: Midland Energy Services Ventilation ductwork: Lindab Solar PV: Solar World panels installed by Carbon Legacy Thermal breaks: Marmox Roof insulation: Ecotherm
Additional info
Building type: 1950s solid wall brick house, east-west orientation, detached (91sqm extended to 125sqm)
Location: Nottingham
Budget: Approx £200k including extensions, full refurbishment, full and internal fit-out, garage rebuild, landscaping
Space heating demand
Before: 458 kWh/m2/yr according to EPC at time of purchase
After: 24kWh/m2/yr (PHPP)
Heat load
Before: not known
After: 10 W/m2
Primary energy demand (PHPP)
Before: not known
After: 81 kWh/m2/yr
Primary energy demand (measured)
Before: 330 kWh/m2/yr
After: 81 kWh/m2/yr
Energy performance certificate (EPC)
Before: E 39
After: B90 (predicting space and water heating total of over 13,000 kWh/yr compared with actual value of 5,345 kWh in 2013)
Measured total energy consumption
Before: 275 kWh/m2/yr (Apr 2010-Mar 2011)
After: 56 kWh/m2/yr (Jan-Dec 2013), not including PV use or generation. Electricity figure used is as purchased from the grid.
Measured space heating
Before: 219 kWh/m2/yr (Apr 2010-Mar 2011)
After: 27 kWh/m2/yr (Jan-Dec 2013)
Energy bills
Before: roughly £2,000 at today’s prices
After: Gas & electricity combined use = less than £450 plus standing charges on top (Jan-Dec 2013) (Note: annual PV income exceeds the total gas and electricity bill)
Airtightness (at 50 Pascals)
Before: not known
After: 1.08 air changes per hour
Walls
Before: solid brick walls, no cavity. U-value: 2.1
After: Permarock external insulation system comprising mineral render finish externally (brick slips on bay), 180mm phenolic foam insulation in 2 cross-bonded layers on solid brick walls. U-value: 0.13. Below DPC down to footings (800-1000mm below ground) — 160mm of insulation suitable for below ground use
Extension walls
Permarock external insulation system comprising mineral render finish externally, 180mm phenolic foam insulation in 2 cross-bonded layers and 140mm dense block walls. (Turbo blocks and Marmox structural insulation below DPC) Sand-cement render internally throughout extension and house with gypsum skim (to maximise access to thermal mass). U-value: 0.13
New square bay walls
Permarock system as above but to timber frame. 12mm OSB outside 100mm frame with 100mm glass mineral wool (Crown Rafter Roll 32) between. Intello membrane and Tescon tapes with Contega joining to adjacent plaster. Studs and 12.5mm standard plasterboard and skim internally. U-value: 0.098 W/m2K.
Existing pitched roof
Before: concrete roof tiles (in poor condition) with little remaining felt (hanging in shreds).
After: new concrete tiles over Solitex Plus roofing membrane, then 100mm foil faced PIR. Below that, between the new 150mm joists – Crown Rafter Roll 32 glass mineral wool, Intello membrane taped with Tescon
No 1 and Uni Tape, 25mm battened service void (unfilled) and plasterboard. U-value: 0.13
Flat roof: flat roof membrane above 100mm PIR over 18mm OSB3 deck, then Crown Rafter Roll 32 and rest of build up as per pitched roof. U-value: 0.13
Extension roof: As for main roof: concrete tiles with battens and counterbattens over Solitex Plus roofing membrane, then 100mm foil faced PIR. Below that, between the joists – 150mm Crown Rafter Roll 32 glass mineral wool, Intello membrane taped with Tescon No 1 and Uni Tape, 25mm battened void (unfilled) and plasterboard. U-value: 0.13
Windows & doors
Before: single-glazed with leaded lights and rotten timber frames.
New triple-glazed windows: Green Building Store triple-glazed EcoPassiv doors and windows. Overall U-value: 0.75
Roof windows: Fakro FFT U8 Thermo Passive House certified roof window, quadruple glazed. Overall U-value: 0.58
Floor
Before: Original suspended floor (and solid floor in kitchen) with carpets
After: Compacted and blinded hardcore sub-base, Primary DPM, 300mm Platinum EPS at 0.030 conductivity, second DPM / separating layer, 100mm concrete slab on blinded sub-base, 40mm floating screed laid directly onto slab, Membranes and slab taped and sealed to wall plaster using Pro Clima products including DA-S.
Floor edge insulation: Against all existing retained walls (internal and external) 150mm Platinum EPS taken from underside of slab level all the way down to the footings (approx. 700-800mm vertically), applied internally to external walls and both sides of internal walls. Slab edge insulation 100mm Platinum EPS, screed edges 35mm foil faced PIR edge insulation.
Heating system
Before: 10+ year old oil boiler & radiators.
After: ATAG A203C gas combi boiler (89.3% efficient, SAP2009 – Sedbuk database) with 3 small radiators, later increased to 5 for flexibility.
Ventilation
Before: No ventilation system, reliant on infiltration and chimney for air changes. Window frames were too swollen to open.
After: Paul Focus 200 heat recovery ventilation system. Passive House Institute certified to have heat recovery rate of 91%.
Green materials: Earthborn clay paints, re-used floor boards from ground floor to create new attic floor, roof timbers, joists and some bricks re-used in house or garden, some second hand furniture and fittings, attempted to minimise building waste.
Electricity: 13 x 250W Solar World panels (3.25kW PV system) and Power One inverter.